Thursday 21 October 2010

Cards for Kids

 click HERE to get details.

A few months ago, Aiden and I made cards for 13 kids who are unwell. Here are some of the cards we made:

I made this card for the parents of each child. I cannot imagine what the parents must go through as some of these are very ill with advanced stages of cancer.

Aiden helped me make a card with a joke on the front (and punch line on the inside) for each child and their respective sibling(s). Aiden chose the embossing folder and helped with the embossing of the cards with the Cuttlebug. He also coloured the images on the front of the card (since I was cutting it out it did not matter if the colouring was not perfectly within the lines), contributed some of the jokes and wrote the message inside each card. It took forever but we made these cards over six weeks. It was fun to craft with him...most of the time:)

I also made each child and their respective sibling(s) a card with their name on the front with Penny Black's alphabet with animals stamps. Aiden helped colour these alphabets. Unfortunately I did not take any pictures of these cards. Anyhow since there were so many cards (74 in total), I made a box for each child, so the cards for each family are together. Aiden helped me make the dots on the boxes with a white gel pen. It looks like a lot of work (it is) but it is one of those things that you can do while watching TV.

Many craft companies out there have offered prizes to encourage people to make cards for these kids. The smiles that these cards will bring to a child's face is reason enough to make a card. But the lovely gals who organised this card for kids drive, chose to send me a wonderful package of Nikki Sivils goodies. I will surely be making cards with these gorgeous papers and stamps and posting them on my blog soon. There is another card for kids drive - see HERE for details. Please join, if you can.


And finally and most importantly, please keep these kids in mind and say a prayer for them.

Goodnight!

Tuesday 19 October 2010

PDCC 51

It has been a long day as I have been to London and back for work -- but I still wanted to get my creations in for this challenge. Here are two cards for the PDCC51 based on the colours below.


Monday 18 October 2010

A quick card for CD80

Here is a quick card that I needed to make for a friend, Gareth who got married early this month..... better late than never. So I decided to make a card that would also coincide with the colours of The Color Dare challenge.


How to: I started with Brown Bazzill card stock and some vanilla card stock. Stamped the HA hydrangea stamp with black memento ink and coloured with Copic markers. Added highlights to the petals in the middle with white crayola colour pencils (yes, I used my son's colour pencils and it surprisingly colours well) and cut out image. I cut a piece of vanilla card stock slightly smaller that the base card and stamped with HA Friends definition cling background stamp. To get a lighter image I stamped off the brown ink on a scrap paper before stamping on the vanilla card stock. Then stamped the HA Congratulations stamp and machine stitched it to the base card. Adhered the flower with foam pads and tied a vanilla coloured ribbon to the stem of the flower. I wanted to tie a bow but it was too fiddly, so I settled for a knot. That's my quick and simple card. I tend to like my cards simple, hope you like it too.

Sunday 17 October 2010

A very crafty Sunday

I have managed to get a few hours of craft in today and made a couple of cards - thanks to my sister and brother-in-law having the boys for a few hours. Thanks Diana and Stephen:) 


The first card is made for two challenges: Colour Throwdown #114 and City Crafter Challenge Blog Week 26.


I will be making more of the above card as thank you cards for my son's recent birthday party. I designed a card that he could help me make. He loves to help with the stamping and punching. He finds it easier to punch with Martha Stewart punches than Woodware punches.

How to: Stamp the background with HA Designer Woodgrain with TH Distress Ink Pad Walnut Stain. Use another two stamps (HA Heart Flourish and HA Swirl with Flowers) and ink with TH Distress Ink Pad (Peeled Paint, Barn Door, Vintage Photo). Then spritz with pearlised water (Perfect Pearl plus water in a mini mister) and stamp onto saffron coloured card and dry with heat gun. The pearlised water gives the image a shine. Then use the Martha Stewart butterfly punch. Use foam applicator and add some colour to the edges of the butterfly. Then adhere all components of the cards as above.


The second card I made is for ColourQ Challenge.


I have used the HA Large Flower cling stamp on soooo many of my cards. I just love the versatility of the stamp. I used parts of the flower for the leaves. The background was stamped with Inkadinkadoo Letre stamp with Anna Griffin Green ink pad. I stamped the flowers on coloured cards with StazOn blank ink and added some colour with TH Distress inks, dusty concord and spiced marmalade. For the 'leaves' I used TH Distress inks, shabby shutters and peeled paint. Added some pearls and the DeNami 'Congratulations' stamp was stamped with Versafine Onyx Black ink pad.

Saturday 16 October 2010

2 Sketches 4 You - Challenge #63

I have not posted in such a long time - work and my son turning 5 have kept me busy. Anyhow I am hopefully back to consistent crafting. I saw this challenge and the search for DT members only last night, so I had a go at it this morn. The cards I have made are based on this sketch at 2 Sketches 4 You.


Off late I like to round off the right top corner. I tend to go through phases with craft tools.

And a Christmas card too....

Tuesday 28 September 2010

Embellish Magazine Challenge & Caardvarks Challenge

This card is for the following two challenges:
1. Caardvarks challenge
2. Embellish Magazine Challenge


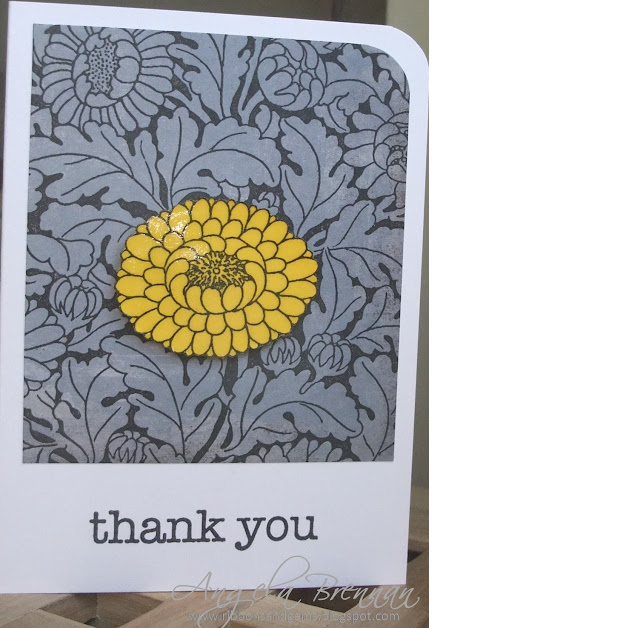
The gray paper is from Basic Grey's Ambrosia paper pad. I stamped the flowers/leaves background with black ink. I stamped the flower again onto yellow card stock and cut it out. Then stuck it on with some foam pads. I added some glossy accent on the yellow flower to give it a shine.

Sunday 26 September 2010

HMITM Challenge #147

This challenge is about using old papers and embellishment that are not in their 'raw' form. I have loads of that from years ago as I hoard craft products. Here are bits I added to the embellishments used in my layout.

These buttons were clear in their 'raw' form. I glued some paper from an old book and sewed in onto the page with some red thread. For the middle button I applied some distress ink to the paper before sticking it to the button.


This embellishment started of as Tim Holtz idea-ology bronze frame. I changed the colour of it with Bottle acrylic paint dabber to match the colours on the page.


I applied glue randomly to the edge of the 12 x 12 card stock and stuck some old music sheet and then tore it off and applied some distress ink and stamped with a map stamp.


And here is the layout.


Saturday 25 September 2010

Practical Scrappers Challenge - Ribbons

A ribbons challenge is one I definitely had to participate. Hence for this challenge I wanted to use ribbon in a way I have never used in a project. This is what I came up with.


Yes, I went back to mat weaving - something I did at art class in school! I decided to keep to the pastel theme.

The Paper Variety Challenge #2

This challenge requires following the parameters set below.


For my page title, I chose a movie entitled You light up my life and for the border I chose to hand stitch some doodles. The sewing of the border took some time but I wanted something that I could do while watching TV. So while watching some mindless TV (Come Dine with Me), I sewed the border.


I used a double sided patterned paper that kinda matched Luke's t-shirt. The little captions along the side of the big pic was cut out of the other side of the patterned paper.

Wednesday 22 September 2010

Spotlighted three times! Woo hoo

I have been spotlighted on three different challenges:
1. Practical Scrappers - Buttons challenge
2. City Crafter - Tree(s) challenge - go to the bottom of the blog for the spotlighted projects
3. colourQ challenge -  I used the same tree card as in the City Crafter challenge and they were both spotlighted!

I need to learn how to get the spotlight blinky on the side of my blog page. If anyone know the 'how to', please do tell.

Off to bed early today, as I have an early meeting at work tomorrow. Hope to post a creation for a new challenge tomorrow.

Good night!

Tuesday 21 September 2010

Colour Create Challenge #53

This is a colour challenge that gives me an opportunity to make another Christmas card. You can never start too early.

Sunday 19 September 2010

Autumn colours

I am maximising my time in my craft room during the weekend. Spent a good part of Saturday organising the boys' rooms. A dear friend of mine, Rani and her husband, Mano (from Malaysia) came to visit for a week and stayed with us. We moved the boys into one room to allow them to have the other room. However, now the boys want to continue sharing a room. So we have moved them to the bigger room and will use the other room as their study. Do they need a study? Probably not but us it a space for Aiden to put his school books, bag, desk etc.

I made the card below for a few challenges - City Crafter Challenge BlogcolourQ Challenge and Pollycraft Challenge Blog. It is quite simple and perfect for a guy.


I finally used the HA Creative Trees WB stamps that I got ages ago. I do really need to enter challenges to use my vast supply of craft products.

Saturday 18 September 2010

Practical Scrappers Challenge - Buttons

This is my first post in a week. I've been quite busy with work. Anyhow I saw this challenge about 6 hours before the deadline and because it was buttons, I just had to submit a project. So in between cleaning and cooking dinner, I came up with this layout of my sister, her husband and their lovely daughter - the Small family.


Once I started with the buttons theme I could not stop, so here are a couple of cards with buttons.


Saturday 11 September 2010

One for the Boys!

I have been waiting for a challenge for boys and there are two challenges that fit the bill. This layout is for ColourQ challenge-49 and CCCB Week 21. These pictures of my sons were taken professionally in Nov 2009 at their nursery.


Ever since Aiden heard the song "Two little boys" by Rolf Harris, he loved it. He likes to say that the songs are about his brother and him. Most of the layout is with my trusty Uniball Signo White Gel Pen. I really love the look of it against a dark colour.

Wednesday 8 September 2010

Colour Create Challenge

Challenge 52 - Pastel Lilac, Pastel Yellow and Pastel Mint

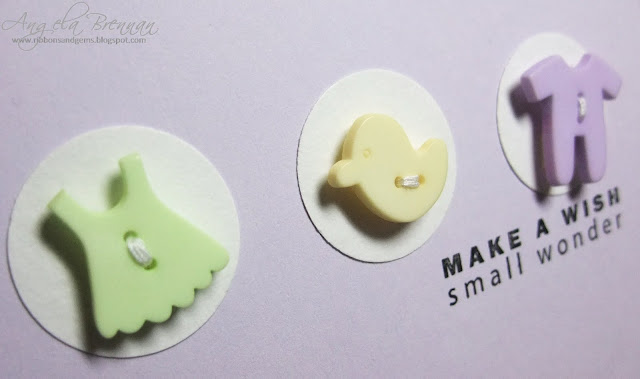
This is the first time I am joining this colour challenge. The pastel colours immediately made me think of a baby card. However as I was doing this card I decided to do a first year baby girl card without having 'Happy Birthday on the card.


Tuesday 7 September 2010

Stamp Away With Me - Colour Cue {7} Challenge

This is a colour challenge and I have realised that I do like these better than sketches, for cards at least. I do do better with a sketch for a scrapbook layout. Anyhow, this challenge requires the use of aqua, gold, red and cream/white. This is a pretty simple stamped card. I used TH distress ink pad Scattered Straw for the 'gold'.


I used glossy accents on the dots to give it a shine and some dimension. 

Monday 6 September 2010

Crafty JC Challenge #2

I was looking around the www and stumbled across this challenge and decided to participate. Generally, the pink and brown combo would be a baby girl card for me. However since I had a birthday card to make for a sweet little girl in a couple of weeks, I took this opportunity to get ahead of the game. I like my cards not too busy.


Supplies:
Patterned paper - DCWV MatchMakers (Wedding Prints Paper Stack)
Brown Kraft card stock
Prima flowers
Buttons Galore - Vintage Rose
Glossy Accent
Light Pink thread (machine stitching)
Sentiment stamps
Versafine ink pad - Onyx Black

I used the Glossy Accent to attach the flower to the card as that will make it stay on permanently, especially if it's sent through the post. For the leaves of the flower, I just cut up a green Prima flower.

CCCB Week 20 - Let Your Light Shine

This week's theme is "Let Your Light Shine". The challenge is to create a project with either the word "light" in it or has an image of something that gives light on it (sun, moon, lamp, light bulb, lighthouse, etc.).


When I saw this challenge, I immediately knew I was going to do a layout on Aiden's love for the song "You are my Sunshine". Here is my take on it.


I printed the titles and journaling directly onto the card stock.


Used the Marvy markers directly on stamp, huffed on it and stamped onto the card stock. Added Glossy Accent to the centre of the flowers.


The journaling is hidden in the layered pouch above. It reads as follows:


"Since 2008, Aiden’s favourite song has been “You Are My Sunshine”. He will sing (only the chorus) it to anyone who asks him to sing a song, especially Thatha and Ammamma.


For his Daddy's fortieth birthday, Paul compiled a video where friends and family would say a few words. When it was Aiden's turn he said he wanted to sing "Happy Birthday" to Daddy. However, when the video was turned on, he started singing "You Are My Sunshine".


He also went on stage and sang this song in front of all the guests at David and Donnamarie’s wedding reception on 9 April 2010. This song is also always requested by Aiden when he gets into Daddy’s car."


When I started this layout, I wanted to know the original singer and writer of this song and googled it. Only then did I realise that there was a bit of a controversy about this and hence there is a pouch for the history of this song, and of course also one for the lyrics. I like the pouch idea, so you will definitely be seeing it again

Supplies:
Card stock - Bazzill Bling Card, BG Basics Tally-Bas, Ivory
Title Font - SA Inkspot
Journaling Font - Rough Typewriter
BG Rub On
TH Distress ink pad - Walnut Stain, Mustard Seed, Wild Honey
AL Clear Stamps - Word Flourishes by Rhonna Farrer
Clear Button
ColorBox Fluid Chalk ink pad - French Blue
Marvy Brush markers - 13 Ochre, 25 Bottle Green
Sunflower border stamp (not sure from where)
Silhouette image - sun_1577
Glossy Accent

Sunday 5 September 2010

2 Sketches 4 You - Challenge #60

This is Sketch 60 at 2 sketches 4 you.


I turned the sketch 180 degrees to get this.


I made this card for my nephew's sixth birthday. I wanted to use the base card in kraft and did not have any. So I cut up a filing folder to the size I needed and used it as my card base. I stitched the patterned paper onto the base card and added the stamped and coloured image with sentiments and some buttons with twine. I kept the card simple as...well that's the way I like it.

Supplies:
Card stock - Kraft and White
Patterned paper - Nana's Nursery Baby Boy
Basic Grey buttons
Natural twine
Clear Expressions Sentiments Stamp
Gillian Roberts' Clear Stamp - Soccer Crazy
Copic Markers
Versafine ink pad - Onyx Black
Tim Holtz Distress ink pads - Broken Chine and Peeled Paint

Saturday 4 September 2010

Embellish Magazine Challenge

This is a colour challenge using squares. It requires the use of black, green and purple AND squares must be incorporated on a project. Here is my take on it.


Supplies:
Card stock - lilac and black
Personal Impressions (P570R) stamp - Winter Scene
Perfect Pearls - Forever Green
Woodware clear stamp - Tiny Phrases by Francoise Read
Versafine ink pad - Onyx Black
Versamark ink pad
Versamark pen
White embossing powder

This card was pretty simple, once I decided which stamp to use. The stamp is actually rectangle but I embossed it with white embossing powder and then cut the bottom of the image off to make it a square. Then cut it into four squares and attached it to a 5" square lilac card. The square on the top right is raised with foam pads to add interest. I used a versamark pen on the moon and brushed some 'forever green' perfect pearls on it. I know it is not a conventional colour for a moon but on some dark nights it does take a green hue (in my view anyway!).

Friday 3 September 2010

Totally Gorjuss Challenge #45

This challenge is for a Christmas project. Here are a couple of cards that I made today. The first one is super simple, while the second card has a lot of Copic colouring.


Supplies:
Card stock - Red and Ivory
HA Stunning Snowflakes DesignBlock Stamp
Inkadinkadoo Stamp - Sentiment
Memories Dye Ink Pad - White
Adirondack Embossing Powder - Moss
Versamark Ink Pad
Rhinestone gems
Ivory thread (machine stitching)


Supplies:
Card stock - kraft and ivory
Christmas Stain Glass Window (not sure from where)
Copic Markers
Black embossing powder
Versamark ink pad
Satin ribbons - ivory, light blue, red, green
Sentiment - 'Peace on Earth' (not sure from where)
Versafine ink pad - Onyx Black

Thursday 2 September 2010

Practical Scrappers Challenge - White Writing Instrument

This challenge requires the use of white writing instrument(s). I used a white colour pencil on the flower and white gel pen for faux stitches on my card below. The pearls in the middle of the flower were ivory, but I coloured it with a Copic marker to obtain the colour required.


Supplies:
Cardstock - Kraft, Ivory, Pale Yellow and Green
White Crayola colour pencil
Uni-ball Signo Gel Pen White Smooth Medium
Faber-Castell Polychromos colour pencil - 108 Dark Cadmium Yellow, 109 Dark Chrome Yellow, 115 Dark Cadmium Orange
HA Cling Stamp - Large Flower
HA Cling Stamp - Friend Definition
Tim Holtz Distress Ink Pad - Scattered Straw
Inkadinkadoo clear stamp - Dot Flourishes
HA Clear Stamp - Scattered Leaves
HA Shadow Ink Pad - Soft Sand
White Embossing Powder
Colorbox Fluid Chalk Ink Pad - Olive Pastel
Versamark Ink Pad
Versafine Ink Pad - Vintage Sepia
Flat backed faux pearl
Sketch Copic Marker - YR15 Pumpkin Yellow
HA Clear Stamp - Classic Messages 2x3